Initial Setup
Settings and Passwords
| Smartlogger 1000 Password for Initial Login direkt an Logger | 000001 |
| Smartlogger 1000 Password for Initial Login via WEBServer/GUI am Laptop | Changeme |
| German NetEco ServerIP Address | 52.58.164.53 |
| German NetEco GUI Login | https://52.58.164.53:8443 |
| NetEco Paramter set in SmartLogger 1000 to transfer Data | 52.58.164.53 — PortNumber: 16100 |
| DHCP Support SmartLogger 1000 | yes – the dynamic DHCP address used in the sample is : 192.168.2.113 |
| Connect to local Webserver | yes – by using https — Sample: https://192.168.2.113 |
| Telekom DSL Router | Speedport W 724 V |
| Telekom DSL Router IP Address | 192.168.2.1 |
| Email Adress from German Huawei Support | de_inverter_support@huawei.com |
Step1: Verify DHCP Connectivity of our Local Network using a Laptop
- Connect a Laptop/Smartphone to the Local Network either via WLAN or LAN
- On Windows use ipconfig to get the Gateway/Network IP of our router [ 192.168.2.1 for Speedport W 724 V / 192.168.1.1 for Speedport LTE II

- Our Laptop got assigned an IP Address – 192.168.2.7 -> DHCP works
- The router address is 192.168.2.1
- Use a Broser and connect to http://192.168.2.1 and display the
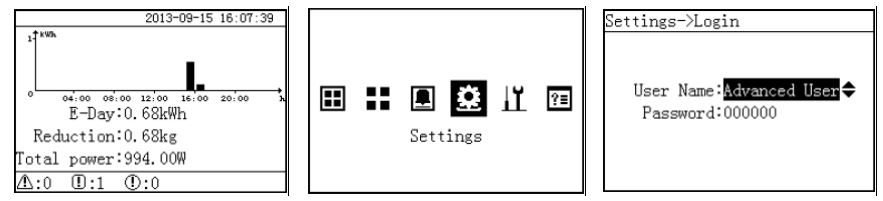
Step 2: Initial Login to the SmartLogger 1000
- Initial Password: 000001
- User: Erweiterter User ( Advanced User )
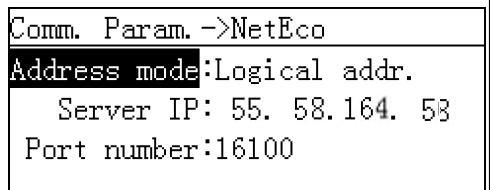
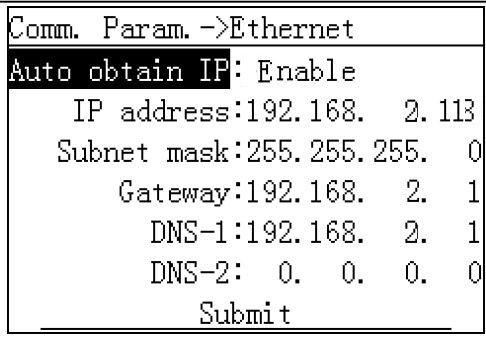
Step 3: Setup SmartLogger 1000 for NetEco Portal and allow local Network Access
- Enable DHCP by setting Auto Obtain IP from Disable to Enable

- Set the German NetEcpo Server IP : 52.58.164.53
- Don’t change portnumber !
- Verify IP settings : Logger DHCP IP Address 192.168.2.113
- Verify IP settings : Gateway/DNS IP 192.168.2.1
- Note: IP Adresss, Gateway and DNS should be set by the DHCP Server
- This will happen automatically if Auto Obtain IP Address is set to: Enable
Optional Step 4: Verify your IP Address by login into Router
- Verify IP settings : Login to your Router and verify DHCP settings. For Telekom Router Speedport W724V use: IP 192.168.2.1
- Verify IP settings : Gateway/DNS IP 192.168.2.1
- mylaptop is our Laptopn connected via WLAN
- PC 192-168-2-113 is the smartlogger connected via Lan b< using a DHCP address 192.168.2.113

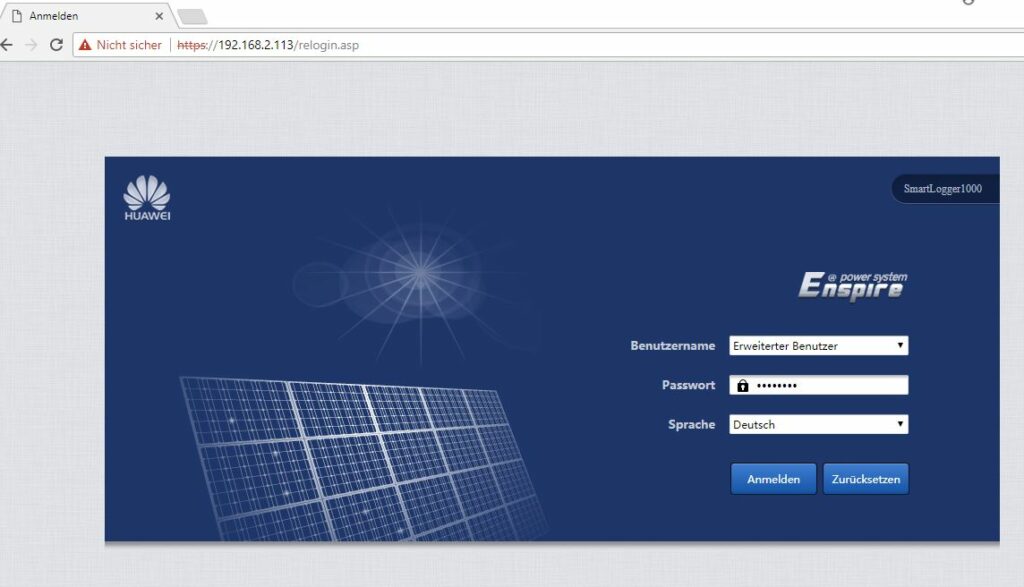
Step 5: Zugriff an den localen WEB Server des SmartLogger 1000
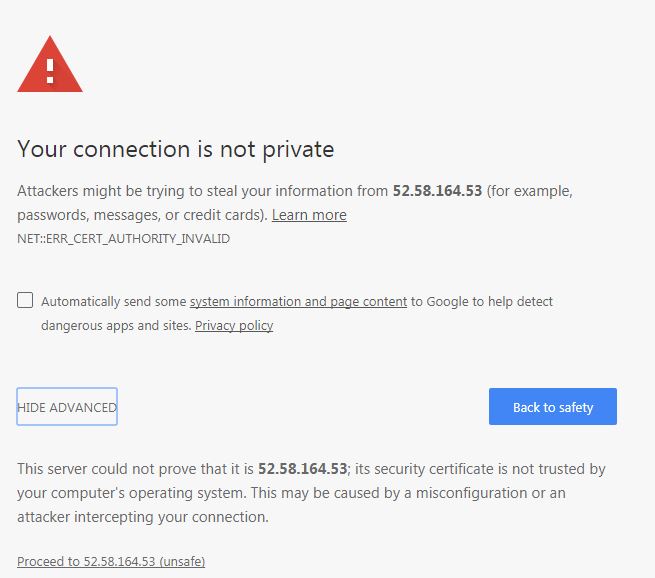
- Note: To overcome a potential Chrome Security Exception using https protocol simply select the “Advanced” link, then choose “Proceed to <link > (unsafe)
Erster Login über das https Protocol mit der zuvor bestimmten DHCP Addresse. Beispiel:
https://192.168.2.113
Benutzer: Erweiterter User
Das Default Password for das WEB GUI des Smartlogger 1000 ist: Changeme
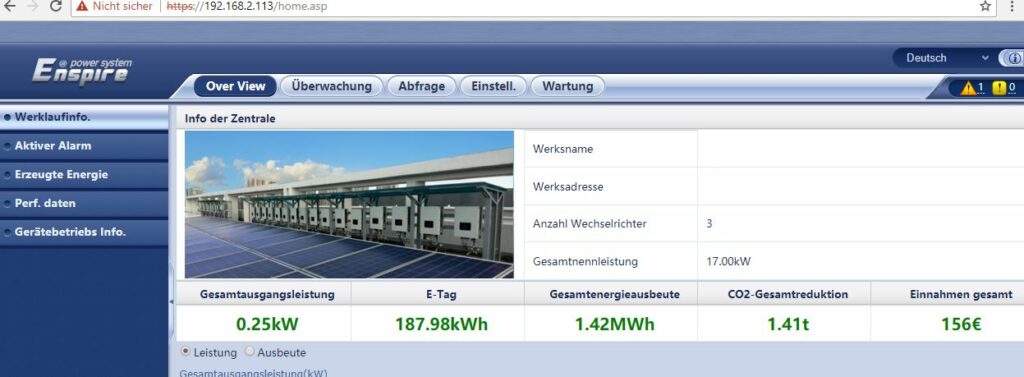
Initial Page after Login to the SmartLogger 1000 Local Webserver
Step 6: Get Login credentials for NetEco Portal
- Send an email to requesting a NetEco Account from Huawei : de_inverter_support@huawei.com
- You need to provide the following Details Anlagen-Name / Portal-User / Smarlogger 1000 Seriennummer
- Login into NetEco Portal using following URL: https://52.58.164.53:8443/index.action
- To overcome a potential Chrome Security Exception simply choose the “Advanced” link, then choose “Proceed to <link > (unsafe)
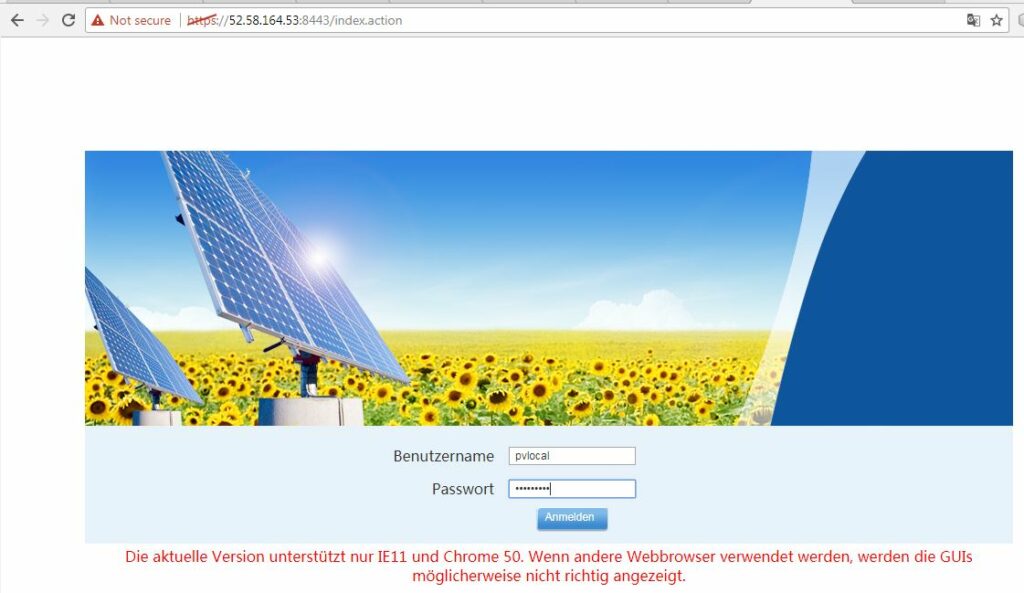
]
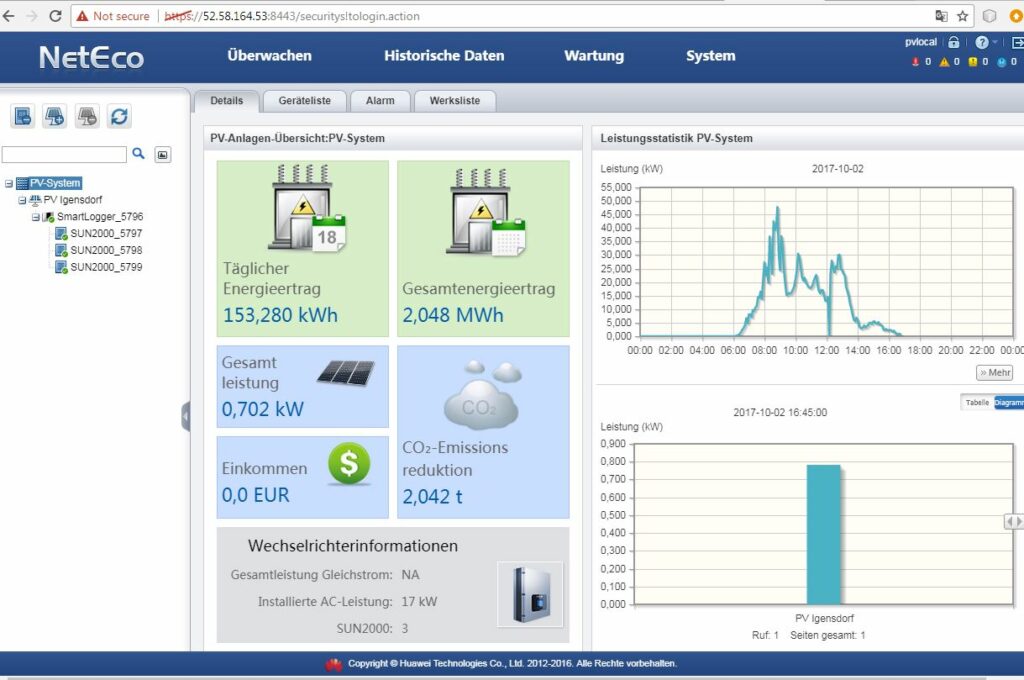
Step 7: First Login into NetEco Portal
- Top Level Page after login to the NetEco Portal

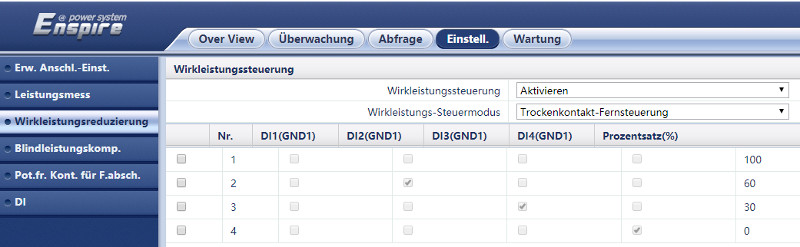
Step 8: Setup FRE
- Zum FRE setup bitte als “Spezieller Benutzer” einloggen
- Wirkleistungsteuerung aktivieren
- Wirkleistung-SteuerModus: Trockenkontakt-Fernsteuerung [ strange Translation ?!?]
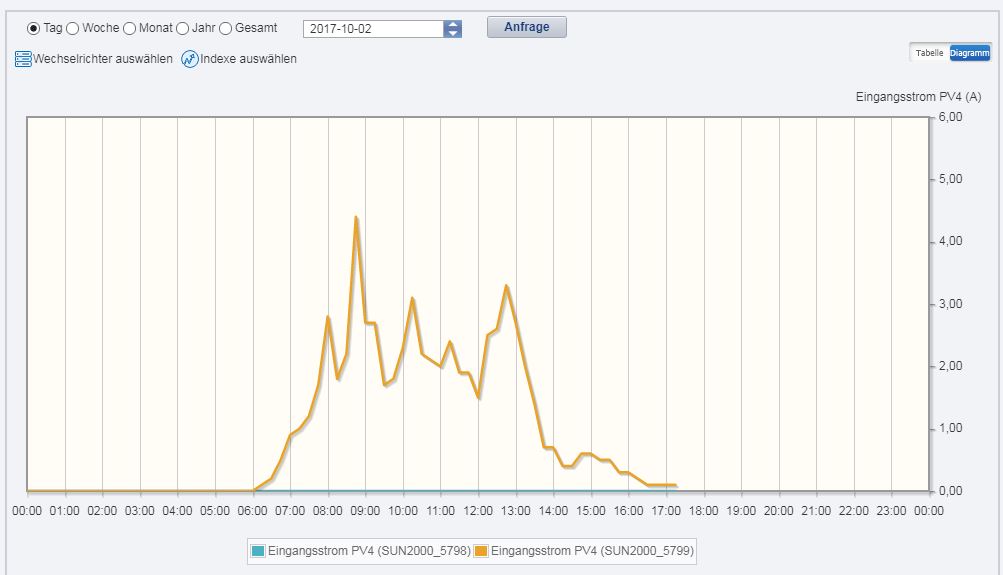
Monitoring Inverter Performance
Compare Inverter Performance
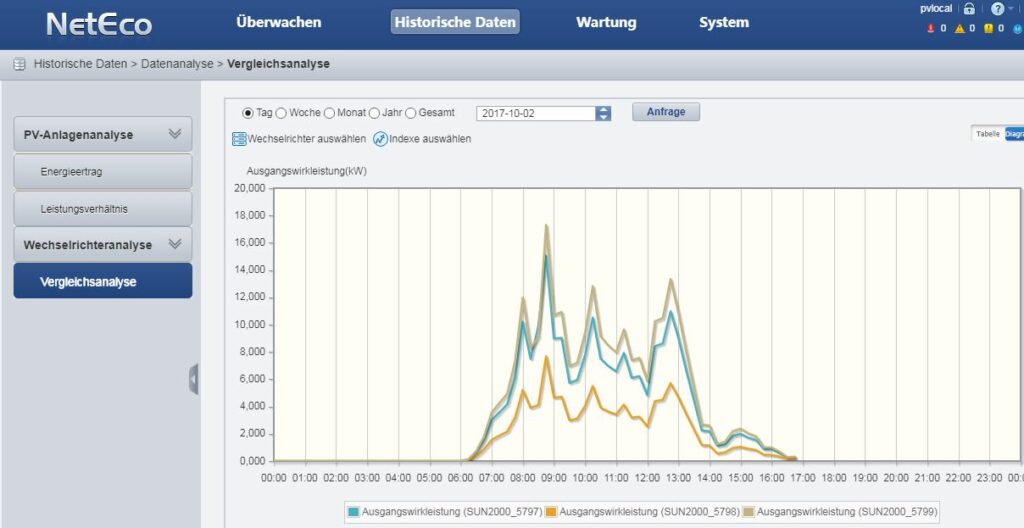
- The Green and Blue INVERTER should have the same AC Power
- Lets compare each String more in Detail
| Diagram showing that both Strings perform WELL ! | Compare 2 Strings from 2 different Inverters |
|---|---|
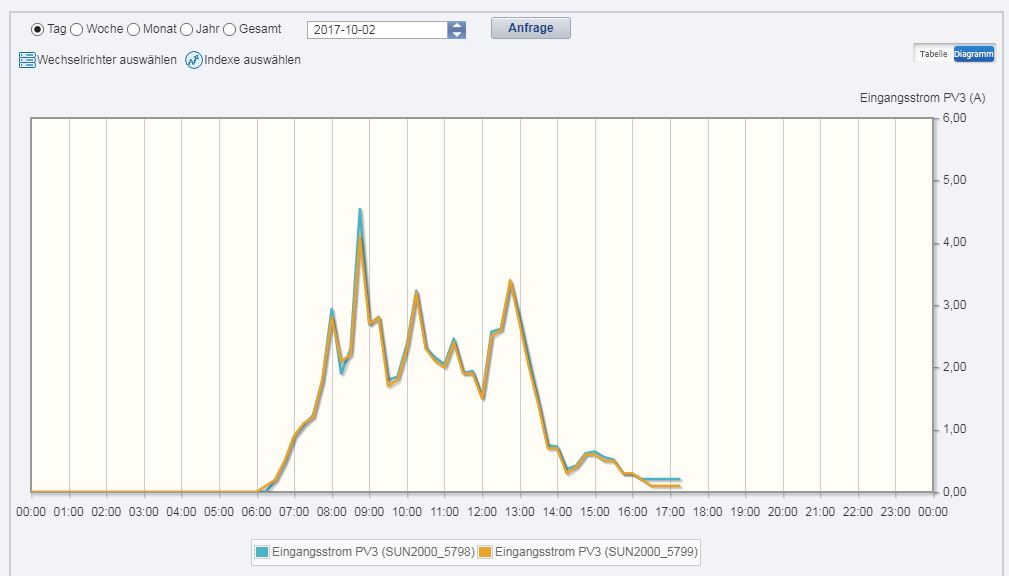 |
|
| Diagram showing a REAL String Problem | Compare 2 Strings from 2 different Inverters |
 |
|
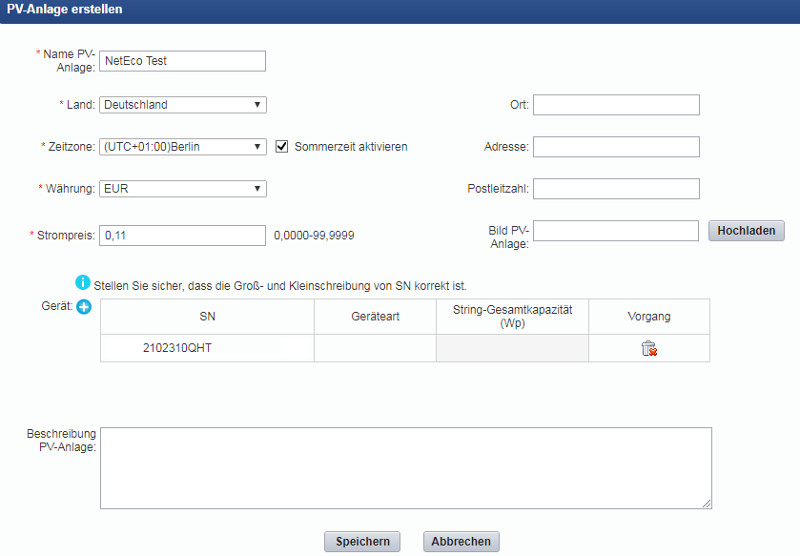
Ein neues System zum NETECO Portal hinzufügen
Unter Photovaltail-System-Übersicht den blauen Button mit Label PV-Anlagen erstellen drücken
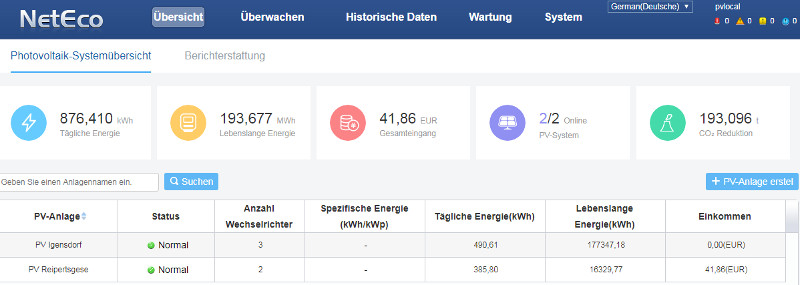
List Elemente ausfüllern und die Smartlogger 1000 Serien-Number eingeben
- Beachte: Eine reale Smartlogger 1000 Serien-Number ist deutlich länger !